本文将基于 Webpack 5 配置出一套多页面的前端开发工作流. 适用于传统的后端模板渲染情景. 示例代码请点击链接.
基础配置
首先我们创建一个空文件夹, 然后创建一个基础的 Node 项目: yarn init -y. 添加 Webpack 依赖 yarn add -D webpack webpack-cli.
创建一个基本 webpack.conf.js 配置文件:
添加多页面
接下来我们添加多页面 a.html 和 b.html 在 src 中. 这里 a.html 是一个完成的 html, b.html 是一个 html 片段, 因为大多数后端模板有 layout 机制, 不需要每个模板文件都是完整的 html.
1
2
3
4
5
6
7
8
9
10
11
12
13
14
| <!DOCTYPE html>
<html lang="en">
<head>
<meta charset="UTF-8">
<meta http-equiv="X-UA-Compatible" content="IE=edge">
<meta name="viewport" content="width=device-width, initial-scale=1.0">
<title>Document</title>
</head>
<body>
<div class="a">
This is a.html
</div>
</body>
</html>
|
1
2
3
| <div class="b">
This is b.html
</div>
|
然后我们添加脚本和样式文件, 我们将使用 TypeScript 和 Babel 来编译成 js 文件, 使用 sass 编译 css 文件. 具体文件内容参考示例.
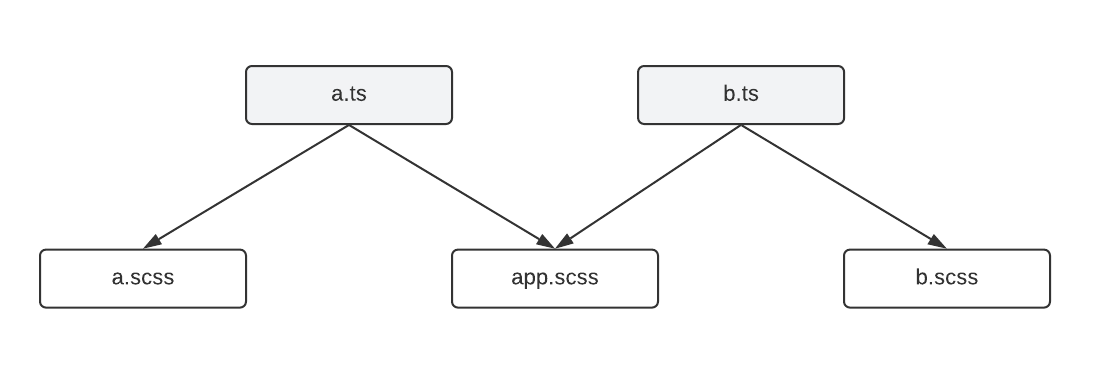
现在我们的文件依赖结构是
Build 多页面
接下来我们添加依赖
1
| yarn add -D typescript babel-loader @babel/core @babel/preset-env @babel/preset-typescript sass sass-loader css-loader mini-css-extract-plugin html-webpack-plugin
|
生成 tsconfig.json 文件:
修改 webpack.config.js:
1
2
3
4
5
6
7
8
9
10
11
12
13
14
15
16
17
18
19
20
21
22
23
24
25
26
27
28
29
30
31
32
33
34
35
36
37
38
39
40
41
42
43
44
45
46
47
48
49
50
51
52
53
54
55
56
57
58
59
60
61
62
63
64
65
66
67
68
69
70
| const MiniCssExtractPlugin = require("mini-css-extract-plugin");
const HtmlWebpackPlugin = require("html-webpack-plugin")
var pages = ['a', 'b']
module.exports = {
mode: 'production',
entry: pages.reduce((e, p) => ({...e, [p]: `./src/${p}.ts`}), {}),
output: {
filename: '[name].[contenthash:8].js',
clean: true,
},
module: {
rules: [
{
test: /\.[jt]sx?$/,
use: {
loader: 'babel-loader',
options: {
presets: [
"@babel/preset-typescript",
]
}
}
},
{
test: /\.s[ac]ss$/,
use: [
{
loader: MiniCssExtractPlugin.loader,
options: {
filename: '[name].[chunkhash:8].css'
}
},
'css-loader',
'sass-loader'
]
}
],
},
plugins: [
new MiniCssExtractPlugin(
{
filename: '[name].[contenthash:8].css'
}
),
...pages.map(p => new HtmlWebpackPlugin({
inject: false,
template: `./src/${p}.html`,
filename: `${p}.html`,
chunks: [p]
}))
],
resolve: {
extensions: ['.ts', 'tsx', '.js']
},
optimization: {
splitChunks: {
chunks: 'all'
}
}
}
|
现在我们执行 yarn webpack, 可以发现在 dist 文件下有以下这些文件:

查看 a.html, 发现它并没有引用我们希望的 a.xxxxx.js 和 a.xxxxx.css, 这是因为我们设置了 inject: false, 不让 webpack 自动注入, 我们希望手动注入这些脚本和样式文件:
通过
1
2
3
4
5
6
7
8
9
10
11
12
13
14
15
16
| <!DOCTYPE html>
<html lang="en">
<head>
<meta charset="UTF-8">
<meta http-equiv="X-UA-Compatible" content="IE=edge">
<meta name="viewport" content="width=device-width, initial-scale=1.0">
<title>Document</title>
<%= htmlWebpackPlugin.tags.headTags %>
</head>
<body>
<div class="a">
This is a.html
</div>
</body>
</html>
|
1
2
3
4
5
| <%= htmlWebpackPlugin.tags.headTags %>
<div class="b">
  This is b.html
</div>
|
再次执行 yarn webpack, 可以看到生成的 dist/a.html 文件 head 部分已经包含了我们脚本和样式文件.